Farokasalma
Showing posts sorted by date for query How Do You. Sort by relevance Show all posts

How To Tie Rope Tie Backs


How to make tie backs, how to tie a tie down rope, tier one tier two, how to tie rope to flag pole, how to tie rope on flagpole, how to tie a tie, how to tie a bow tie, how to take a screenshot,

As a fashion enthusiast, one of the essential skills every man should possess is the ability to tie a tie. While this may seem like a simple task, there are several tie knots to choose from, and each comes with its unique challenges. One popular knot is the Simple Knot, also known as the Oriental Knot. In this article, we'll explore how to tie this knot in an easy-to-follow guide, complete with images.

The Anatomy of the Simple Knot

Before we delve into tying this knot, let's first understand its structure. The Simple Knot is a small, neat knot that is symmetrical and triangular in shape. It is a versatile knot, suitable for most occasions, from informal to formal events. Here's how it looks:

The knot consists of two layers, the outer layer and the inner layer. The outer layer is the visible part of the knot, while the inner layer is the part that holds the knot firmly in place. The knot is tied using a narrow end and a wide end of the tie.

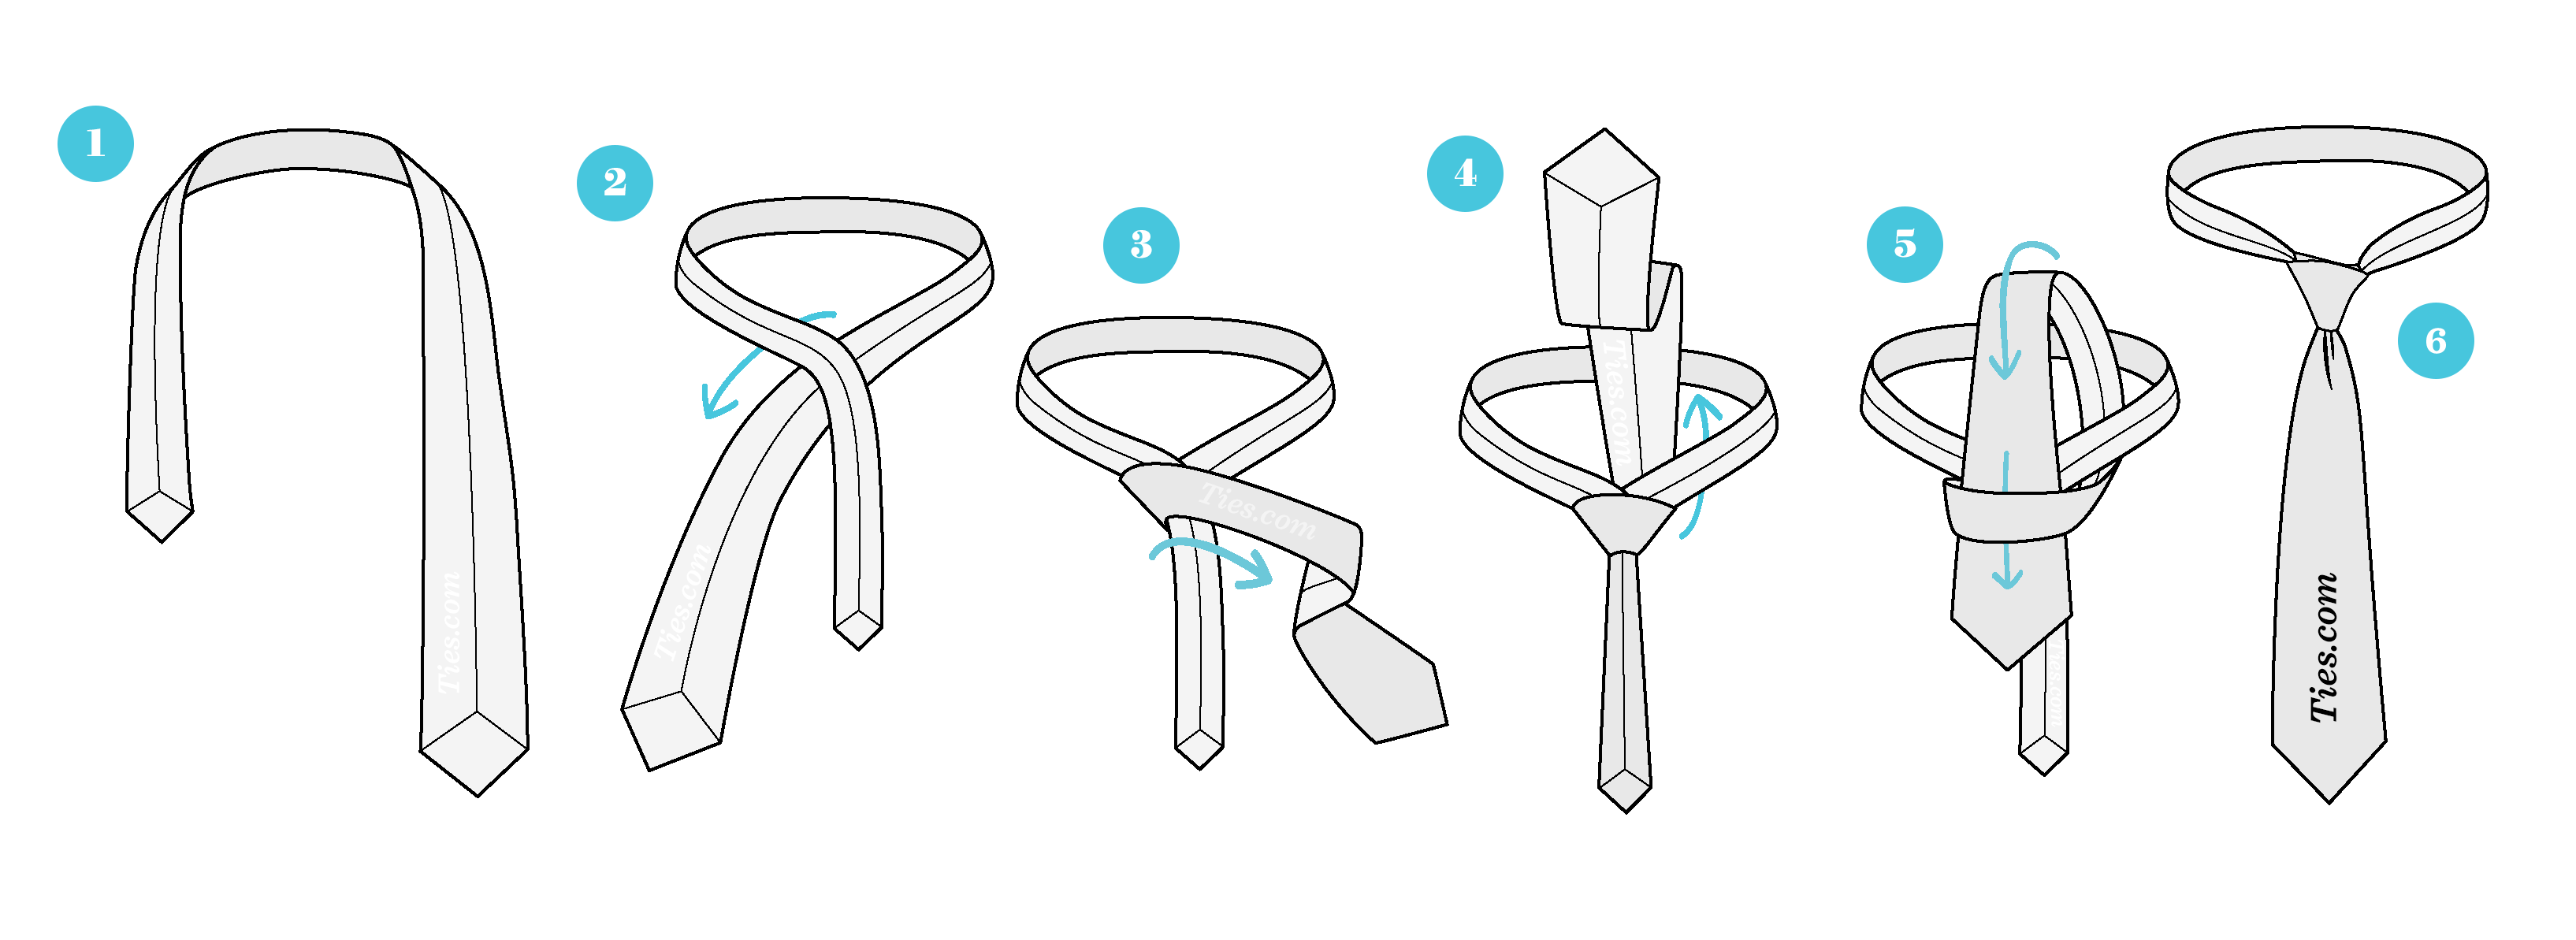
Step-by-step Guide on How to Tie the Simple Knot

Now that we understand the anatomy of the Simple Knot, let's get started on tying it. Follow these simple steps:

Step 1: Start with the Wide End

Hold the wider end of the tie in your right hand and the narrow end in your left. Let the wide end hang about a foot lower than the narrow end.

Step 2: Create a Loop

Take the wide end and cross it over the narrow end to create a loop. Make sure the loop is tight and symmetrical. Keep the loop loose enough to allow the tie to pass over it with ease in the later steps.

Step 3: Bring the Wide End Up and Over

Take the wide end and bring it up and over the loop you created in step two. Hold the knot in place with your left hand.

Step 4: Pass the Wide End Through the Loop

Take the wide end and pass it through the loop you created in step two. Ensure the tie is neither too tight nor too loose, find the perfect balance.

Step 5: Create the Knot

Take the wide end and bring it down over the front of the knot you created in step four. At the same time, use your left hand to hold the knot steadily in place. Ensure that the narrow end hangs vertically.

Step 6: Bring the Wide End Up and Over Again

Take the wide end and bring it up and over the knot, making sure it passes over the knot with ease.

Step 7: Pass the Wide End Through the Loop Again

Take the wide end and pass it through the loop created in step six, creating a second loop. Once again, ensure the tie is neither too tight nor too loose.

Step 8: Final Touches

Bring the wide end down and over the front of the knot one final time. Use both hands to adjust the knot to the desired tightness. You can also adjust the length by sliding the knot up and down the narrow end.

Conclusion

Learning to tie a tie is an essential skill for every man. The Simple Knot is a versatile knot suitable for most occasions. With this guide, you can now tie this knot with ease, creating a symmetrical and neat triangular knot that will add a touch of elegance to your outfit. Try it out today!


Also read:

.

Kirkland Cold Brew Coffee Review


Kirkland signature cold brew coffee review, kirkland cold brew coffee caffeine amount, kirkland cold brew recall, kirkland cold brew coffee recall, kirkland cold brew coffee, kirkland cold and flu severe, kirkland cold and sinus canada,

Hey there, fellow coffee lovers! Are you always on the lookout for new and exciting coffee drinks to add to your routine? Well, if you're a fan of cold brew, then you're in luck because I've got some great news for you. I recently stumbled upon a fantastic product that I just had to share: Kirkland Signature's Cold Brew Colombian Coffee.

Kirkland Signature Cold Brew

This cold brew coffee comes in a neat little can, which makes it super convenient to grab on-the-go. Each can contains 11 fluid ounces, which is the perfect amount to get you through a busy morning or afternoon. Not only is it convenient, but it also has a smooth and refreshing taste that any coffee aficionado would appreciate.

Kirkland Signature Cold Brew Nutrition Facts

Now, I know what you're thinking: "Isn't cold brew stronger than regular coffee?" Well, that's actually not the case with Kirkland's Cold Brew. Each can has a caffeine content of about 165 mg, which is just the right amount to give you a little energy boost without going overboard.

Kirkland Cold Brew Coffee Flavor

Not only is it the perfect caffeine fix, but the flavor is outstanding as well. The coffee is made from 100% Colombian beans, which gives it a rich and bold taste. Plus, it's not too sweet or too bitter, making it the perfect drink to accompany breakfast or as an afternoon pick-me-up.

Kirkland Cold Brew Coffee Review

If you're still unsure about whether or not you should try Kirkland's Cold Brew Colombian Coffee, check out some of the reviews online. Many people have raved about its smooth taste, convenient packaging, and the perfect amount of caffeine. It's easy to see why this cold brew coffee has become such a hit among coffee lovers.

In conclusion, if you're a fan of cold brew coffee and looking for a new go-to drink, then Kirkland Signature's Cold Brew Colombian Coffee is definitely worth trying. With its convenient packaging, delicious flavor, and perfect caffeine content, it's a surefire way to start your day off on the right foot.

Kirkland cold brew coffee 12 pk. $13.99 my wholesale life. Kirkland cold brew coffee review review. Brew kirkland costco costcofan colombian. Brew kirkland signature gearhungry. Costco kirkland cold brew coffee, 12 cans costco fan. Kirkland colombian lb. Brew kirkland

If you are looking for Kirkland signature cold brew coffee – cold brew chick, you've came to the right web. We have images like Kirkland signature cold brew coffee, コストコの『kirkland cold brew coffee』が缶コーヒーで美味しい! 買てみた エナジードリンク, コーヒー, 缶コーヒー, kirkland signature cold brew coffee – cold brew chick. Here it is:

Costco kirkland signature cold brew colombian coffee review costcuisine, kirkland signature signature cold brew colombian coffee 12 cans /11 fl


Also read:

.

How To Screen Record With Iphone


How to screen record with iphone 13, how to screen record with sound on iphone, screen recording with iphone, how to screen record with audio on windows 10, how to screen record with nvidia geforce, how to screen record on windows 10, how to screen record on iphone, how to screen record on hp laptop, how to get help in windows, how to recall an email in outlook, how to print screen,

Do you want to know the secret to recording your iPhone screen without an app? You're in luck because iOS 11 has made it super easy! No more downloading third-party apps or complicated settings, just a few simple steps.

Step 1: Add Screen Recording to Your Control Center

The first step to recording your iPhone screen is to add the screen recording feature to your Control Center. Go to Settings > Control Center > Customize Controls and add the Screen Recording option.

Step 2: Begin Recording

Now that you have added the screen recording feature to your Control Center, you can start recording by simply swiping up your Control Center and selecting the Screen Recording option.

Step 3: Customize Recording Settings

Before starting the recording, you have the option to customize the recording settings such as selecting whether to record audio from the microphone or not.

Step 4: Stop Recording and Save the Video

To stop the recording, simply tap the red status bar at the top of your screen and select Stop. The video will be saved to your camera roll and can be edited or shared as desired.

So there you have it, a quick and easy way to record your iPhone screen without the need for any additional apps. Whether you want to share a cool gameplay moment, demonstrate an app feature, or create a tutorial, screen recording has got you covered. Try it out and impress your friends with your newfound iPhone skills!


Also read:

.

How Do You Sleep To Get Taller


How do you sleep to remove a stomach ache, how do you sleep when you lie to me, how do you sleep chords, how do you sleep with your eyes open, how do you pronounce, how do you spell, how do you get scabies, how do i play wordle, how do you pronounce, how does venmo work, how do you get ringworm,

Have you always dreamt of being taller? Well, the good news is that you can still achieve your desired height even when you are fast asleep. It sounds too good to be true, right? But, it is possible with a few scientific strategies that can be practiced, and I am here to guide you through the process. Before we dive into the strategies, let us first understand the science behind growing taller.

The Science Behind Growth

As we all know, growth is a natural process that occurs in humans during childhood and adolescence. This growth is stimulated by the production of the human growth hormone (HGH) by the pituitary gland. HGH is responsible for the growth and maintenance of all body tissues, including bone, muscle, and organs.

However, after reaching adulthood, the production of HGH gradually decreases, and hence, the growth rate also slows down. Though we can't increase the natural production of HGH in adults, we can optimize the factors that can enhance the growth process. And this is where our sleeping habits come into play.

Sleep and Growth

Our body is designed to carry out several essential functions while we sleep. This includes digestion, repair, and growth. While we rest, our body shifts its focus towards repairing and growing tissues, including bones. Therefore, getting enough quality sleep is crucial for optimum growth, especially during adolescence when the growth rate is at its peak.

But, that's not it. There is a lot more that can be done to enhance the growth process while we sleep. Let us explore a few strategies.

Strategies to Grow Taller During Sleep

1. Sleeping Position

The position in which we sleep can significantly impact our growth rate. Sleeping on your back or stomach can compress the spine and disrupt the natural alignment of the body. The ideal sleeping position for optimum growth is to sleep on one's side with a pillow between the knees and keeping the spine straight.

2. Sleeping Environment

The sleeping environment also plays a vital role in determining the quality of sleep, which, in turn, affects growth. Ensure that your sleeping area is free from any noise disturbances and is a comfortable temperature to promote restful sleep.

3. Sleeping Duration

Getting enough sleep is essential for optimum growth. It is recommended to get at least eight hours of uninterrupted sleep every night to promote the natural growth process.

4. Supplements

Supplements are not a sure-shot way to enhance growth, but they can aid in the process. Consuming supplements like calcium, vitamin D, and zinc can support bone health and growth. However, it is crucial to consult a doctor before starting any supplements.

5. Stretching

While we sleep, our body is at rest, and our muscles tend to become stiff. Incorporating stretching exercises before bedtime can loosen up the muscles and improve flexibility, which aids in growth.

Conclusion

While growing taller is impossible for adults, there are still a few ways to enhance the growth process. One such way is by optimizing our sleeping habits. Sleeping in the right position, creating a comfortable environment, getting enough sleep, consuming supplements, and stretching can aid in the process of growing taller. However, it is crucial to remember that genetics do play a role in determining one's height, and it might not be guaranteed that everyone will achieve their desired height.

So, why wait? Start optimizing your sleeping habits today to enhance the growth process. Here's to a taller and healthier you!


Also read:

.

How To Calculate Percentage Probability


How to calculate percentage probability, how to calculate probability given percentage, how to calculate percentage in excel formula, how to calculate percentage growth, how to calculate gpa, how to calculate bmi, how to calculate average, how to calculate standard deviation, how to screenshot on windows 10, how to take a screenshot, how to write a cover letter,

Probability is a topic that can be both fascinating and intimidating, depending on how familiar you are with the subject matter. It may sound like a complicated concept, but understanding probability is crucial in many aspects of our lives, from predicting outcomes of sporting events to calculating the risks and benefits of medical treatment.

Understanding Probability Basics

Before we dive into the nitty-gritty of probability calculations, let's start with some basic definitions and concepts.

Probability is the measure of the likelihood of an event occurring. It is expressed as a value between 0 and 1, with 0 meaning that the event is impossible and 1 meaning that the event is certain to happen. For instance, if you roll a fair six-sided die, the probability of getting a 1 is 1/6, or approximately 0.167.

In real life, probabilities are often expressed as percentages, which are simply a way of scaling the probability value from 0 to 100. For example, the probability of rolling a 1 on a fair six-sided die can be expressed as 16.7%.

Another important concept in probability is the notion of independent and dependent events. Independent events are events that have no effect on each other, meaning that the outcome of one event does not impact the outcome of the other. For example, flipping a coin twice is an example of independent events. Dependent events, on the other hand, are events where the outcome of one event does affect the outcome of the other. For instance, drawing two cards from a deck without replacement is an example of dependent events.

Calculating Probability with Percentages

One common way of calculating probability is through the use of percentages. To do this, you'll need to convert the percentage to a decimal and then multiply it by the total number of outcomes. For example, let us suppose that you have a bag filled with marbles, and 30% of them are red. If the bag contains 50 marbles, then:

Number of red marbles = 0.3 * 50 = 15

This means that the probability of selecting a red marble from the bag at random is 15/50, or 0.30, which can be expressed as 30%.

Another common way of calculating probability with percentages is through the use of a contingency table. A contingency table is a table that displays the frequencies of two categorical variables. Suppose you want to know the probability of a patient having a certain disease given that they tested positive for it. You might collect the following data:

Test Positive Test Negative
Disease Present 30 20
Disease Absent 10 40

To calculate the probability of a patient having the disease given that they tested positive, you would use the following formula:

Probability of Disease Given Positive Test = (Number of Positive Tests with Disease / Total Number of Positive Tests) * 100

In this case, the probability of disease given a positive test is:

Probability of Disease Given Positive Test = (30 / (30 + 10)) * 100 = 75%

Conclusion

Probability is an essential tool for making informed decisions, whether you're an investor analyzing stock market trends, a doctor deciding on treatment options, or a student trying to predict the outcome of a coin toss. By understanding the basics of probability and learning how to calculate it using percentages and contingency tables, you can become more confident in your decision-making and gain a deeper appreciation for the world around us.

Remember that probability is not a failsafe method for predicting the future; rather, it provides us with a framework for understanding the likelihood of different outcomes. As with any mathematical concept, practice and perseverance are key to mastering probability, so don't be afraid to tackle new problems and test your skills.


Also read:

.

How To Add Bottom Border In Google Docs


How to add border in google document, how to add bottom border in html, how to add bottom border in excel, add a bottom border, how to add bottom border word, how to add bottom border, excel add bottom border to all rows, how to add bottom navigation bar in android, how to add bottom border in excel, how to add bottom line in excel, how to use vlookup,

If you're a Google Docs user, you know how frustrating it can be to create professional-looking documents when there are no features to customize the appearance of your text. With Google Docs' minimalist design, it's not the easiest task to add design elements to your text. However, there are ways to add cool and stylish borders to your Google Docs documents to make them stand out and look more professional. In this article, we will show you three easy ways to enhance your Google Docs experience with custom borders and a professional touch.

The Power of Google Drawings

If you're a Google Docs user, you are probably familiar with Google Drawings, which can be accessed from the "Insert" menu in Google Docs. Google Drawings is an amazing tool that can come in handy when it comes to customizing your documents. Here's how:

First, start by opening up a new Google Drawings file. Once the file has loaded, go to the "File" menu and select "Page setup." Here, you can customize the dimensions of your drawing to match the size of your document in Google Docs.

Next, it's time to add some borders. To do this, select the "Line" tool from the toolbar and draw a line that matches the dimensions of your document. Once you've drawn the line, customize it to your liking using the "Line Color" and "Line Weight" tools.

Now that you have your border, it's time to add it to your Google Doc. Simply copy and paste your border drawing into the document. From here, you can resize and adjust the position of the border to fit your content. And voila! You've just added a custom border to your Google Doc.

Using Add-ons

If the manual method of creating borders in Google Drawings isn't quite your thing, there's another way to achieve professional-looking borders in your Google Docs documents. There are third-party add-ons available that you can install and use to customize the appearance of your documents.

To access these add-ons, go to the "Add-ons" menu in Google Docs and select "Get add-ons." Here, you can search for border add-ons such as "Page Sizer" and "Table of Contents Plus." Once you've found an add-on you would like to use, simply install it and it will appear in your "Add-ons" menu for future use.

After installing the add-on, simply go to the "Add-ons" menu and select the border you want to apply to your document. From here, you can customize the border's color, weight, and style to suit your needs. Just like that, you've added a professional-looking border to your Google Doc without even leaving the platform!

Customized Templates

Finally, if you don't have a lot of time on your hands and are looking for quick and easy ways to add professional-looking borders to your documents, customized templates may be right for you. Google Docs templates are a great way to add pre-designed borders to your documents without the hassle of creating them yourself.

To access these templates, simply go to the Google Docs homepage and click on "Template Gallery." Here, you will find a wide variety of templates that you can use to customize your documents, including ones with pre-designed borders.

Once you've selected your desired template, simply customize your text to your liking and voila! You have a professional-looking document with a customized border in no time at all.

These three methods are great ways to add custom borders to your Google Docs documents. Whether you prefer to use Google Drawings, add-ons, or customized templates, there's no doubt that your document will look more professional and eye-catching.


Also read:

.

How To Fall Asleep Fast Now


How to fall asleep fast no medicine, how to fall asleep the fastest, how to fall asleep fast when sick, how to fall asleep fast for kids, how to fall asleep easily, how to fall asleep and stay asleep, how to fall asleep faster at night, how to draw,

Getting a good night's sleep can be a struggle for many people. Whether it's stress, anxiety, or even physical discomfort, the obstacles can be numerous. But fear not, there are ways to help overcome these challenges and fall asleep quickly. Here are some tips to help you recharge and wake up refreshed:

1. Create a Sleep-Conducive Environment

One key to falling asleep quickly is creating a suitable environment that encourages sleep. If you're someone who is easily disturbed by noise, invest in some ear plugs, or play some white noise to distract you from any disruptive sounds. Pay attention to temperature and consider using a fan or heater to create a comfortable climate. Also, consider your sleeping surface. A high-quality mattress and supportive pillow can make a significant impact on your comfort level.

Creating the perfect sleep-conducive environment can do wonders for your sleep cycle.

2. Practice Mindfulness

Practicing mindfulness can help you clear your mind, relax, and sleep better. Mindfulness meditation involves focusing on your breath, body and environment in a relaxed and non-judgmental way. It can help reduce stress and anxiety, which can be helpful for sleep. Make time for meditation in the morning or before bedtime. Consider using meditative apps if you need some guidance.

Meditation can be a great way to reduce stress and anxiety at night in order to fall asleep faster.

3. Eliminate Blue Light Exposure Before Bed

Blue light from electronic devices can interfere with your circadian rhythm and make it difficult to fall asleep. Consider shutting off all screens (phones, tablets, and laptops) at least 30 minutes before bedtime. Instead, read a book or magazine, or take a warm bath or shower using dim lights. Stay away from anything that might over-stimulate your mind, and distract yourself from the world around you.

Avoiding electronic devices before bedtime can be an excellent way to minimize the blue-light stimulation and allow your brain to relax.

4. Try Aromatherapy

Aromatherapy has been shown to improve sleep quality. It is a natural way to calm the mind and help you drift off to sleep. Essential oils like lavender, chamomile, and cedarwood are excellent for promoting relaxation and improving sleep quality. Simply add a few drops of the oil to a small diffuser or sniff them straight from the bottle. Alternatively, use a lavender-scented pillow or bedding for long-lasting and calming effects.

Aromatherapy can be a great and natural way to achieve a restful sleep.

5. Establish A Regular Sleep Routine

Going to bed and waking up at the same time every day can help regulate circadian rhythms, which are essential for reaching deep, restful sleep. Your body loves routine, and it will eventually adapt to the schedule that you set. Create a consistent routine that you can easily stick to, and follow it every day. Establishing a regular sleep pattern will help minimize sleep disruptions and promote more energy throughout the day.

Establishing a regular sleep pattern will help minimize disruptions and allow for a peaceful and restful night's sleep.

In conclusion, falling asleep quickly is definitely within your reach. By following these tips, you can improve your sleep, minimize stress, and maximize your energy throughout the day. You, too, can enjoy a peaceful night's sleep, starting tonight!


Also read:

.

How To Clear Cache Google Play


How to clear cache google play store, how to clear cache in google play, how to clear cache in chrome, how to clear browser history, how to clear cookies on iphone, how to lower blood pressure, how to screenshot on windows, how to tie a tie, how to pronounce,

If you're experiencing issues with Google Play Services, where it keeps stopping, don't worry – you're not alone. This is a common problem that many Android users encounter. Thankfully, there are multiple solutions to resolve this inconvenient issue. In this post, we'll walk you through 11+ easy fixes that you can try today!

Clear the Cache and Data

One of the most common and effective solutions to this problem is to clear the cache and data. This will help to remove any corrupted or outdated files that may be causing the issue. To do this, follow these simple steps:

  1. Go to "Settings" and then "Apps & notifications".
  2. Select "Google Play Services" from the list of apps.
  3. Tap on "Storage & cache".
  4. Select "Clear cache" and "Clear storage".
  5. Restart your device and check if the problem persists.

Update Google Play Services

Another simple fix is to make sure that you have the latest version of Google Play Services installed on your device. To check for updates, follow these steps:

  1. Go to the Google Play Store.
  2. Tap on the three horizontal lines in the top left corner to open the menu.
  3. Select "My apps & games".
  4. Find "Google Play Services" and tap "Update" if it's available.
  5. Restart your device and check if the issue has been resolved.

Uninstall Updates

If the issue started after a recent update, you may want to uninstall the updates to Google Play Services. To do this, follow these simple steps:

  1. Go to "Settings" and then "Apps & notifications".
  2. Select "Google Play Services" from the list of apps.
  3. Tap on the three vertical dots in the top right corner.
  4. Select "Uninstall updates".
  5. Restart your device and check if the problem has been resolved.

Restart your Device

Sometimes, simply restarting your device can help to resolve issues with Google Play Services. To do this, hold down the power button until the "Power off" option appears. Tap on "Power off" and wait for your device to shut down. After a few seconds, hold down the power button again to turn it back on.

Reset App Preferences

If none of the above solutions work, you can try resetting your app preferences. This will reset all the default app settings, such as disabled apps, and notification settings. To do this, follow these simple steps:

  1. Go to "Settings" and then "Apps & notifications".
  2. Tap on the three vertical dots in the top right corner.
  3. Select "Reset app preferences".
  4. Restart your device and check if the problem has been resolved.

Disable Battery Optimisation

Some Android devices have a feature called "battery optimisation" which limits the performance of certain apps to save battery life. This can cause issues with Google Play Services. To disable this feature, follow these simple steps:

  1. Go to "Settings" and then "Battery".
  2. Tap on the three vertical dots in the top right corner.
  3. Select "Battery optimization".
  4. Tap on "All apps".
  5. Select "Google Play Services".
  6. Select "Don't optimize".
  7. Restart your device and check if the problem has been resolved.

Factory Reset your Device

If none of the above solutions work, you may need to consider a factory reset of your device. This will erase all data from your device, including apps, settings, and files. To do this, follow these simple steps:

  1. Go to "Settings" and then "System".
  2. Select "Advanced" and then "Reset options".
  3. Select "Erase all data (factory reset)".
  4. Follow the on-screen instructions to complete the process.
  5. After your device has been reset, set it up again and check if the problem has been resolved.

Conclusion

Encountering issues with Google Play Services can be frustrating, but there are multiple solutions that you can try. From clearing the cache to factory resetting your device, we've outlined 11+ easy fixes in this post. Try these solutions today to see which one works best for you!

We hope that this post has been helpful in resolving the Google Play Services keeps stopping error. If you have any other solutions that have worked for you, let us know in the comments below!


Also read:

.

How To Pronounce Conduction


How to pronounce conduction definition, how to pronounce words, how to pronounce acai, how to pronounce gnocchi, how to pronounce siobhan, how to screenshot on windows, how to change yahoo to google, how to tie a tie, how to pronounce,

Hey there, fam! Let's chat about the word "conduction" today. You may have heard it before, but do you know exactly what it means? Well, we gotchu covered!

Another word for CONDUCTION > Synonyms & Antonyms

First things first, let's break it down. Conduction refers to the transfer of heat, electricity, or sound through a medium without perceptible motion of the medium itself. Now that's a mouthful, but the bottom line is that conduction is when something gets passed from one thing to another without any movement between the two. Makes sense?

Now, when we talk about synonyms and antonyms for conduction, we're talking about other words that mean the same thing or the opposite of conduction. For example, some synonyms for conduction include transmission, transfer, and delivery. On the other hand, some antonyms for conduction include insulation, blockade, and hindrance.

What is aphasia?

Another term that you may come across when discussing conduction is aphasia. This refers to a language disorder that affects a person's ability to communicate effectively. Some symptoms of aphasia may include difficulty expressing oneself, difficulty understanding language, or trouble with reading and writing.

Aphasia can occur as a result of a stroke or other brain injury, and it can be temporary or permanent. It can be a frustrating condition to deal with, but there are treatments and therapies available to help improve communication skills.

How To Pronounce Conductive 😈😈😈😈😈😈Pronunciation Of Conductive

Now let's move on to the pronunciation of conductive. Have you ever come across a word that you're not quite sure how to say? Don't worry, we've all been there. When it comes to conductive, it's pronounced kuh n-duhk-tiv.

It's important to know how to properly pronounce words, especially if you're in a professional setting or dealing with unfamiliar terminology. So, now you know how to say conductive like a pro!

Conduction

Now that we've covered the basics of conduction, let's take a closer look at the concept itself. As we mentioned earlier, conduction is the transfer of energy from one object to another without any visible movement of the medium. This happens when there is a temperature difference between the two objects, causing heat to flow from the warmer object to the cooler one.

For example, when you put a pot of water on the stove to boil, heat is conducted from the stove to the pot, causing the water inside to heat up as well. This is conduction in action!

There are many examples of conduction in our everyday lives, from cooking to heating our homes. So, now that you know what it is and how it works, you can appreciate the role that conduction plays in our world.

And that's a wrap, family! We hope this post helped you understand the concept of conduction a little better, and maybe even taught you something new. Thanks for tuning in, and we'll catch you on the flip side!

How to pronounce conductive🌈🌈🌈🌈🌈🌈pronunciation of conductive youtube. Difference between conduction and induction (with comparison chart. How to pronounce conduction in british english youtube. Conduction lesson. teaching resources. Pronounce® parlez anglais avec aisance avec le casque d'entrainement. The science of english explained understand pronounce®. What is bone conduction? bone conduction

If you are looking for Pronounce powered by aftershokz, you've came to the right web. We have images like How to pronounce conduction vocab today youtube, pronounce powered by aftershokz, the science of english explained understand pronounce®. Here you go:

What is aphasia?, améliorer sa prononciation en anglais sound sense


Also read:

.

Search This Blog

Powered by Blogger.